Windows Update Error 0x80190001 [Solved]
Your antivirus software might be interfering with the PC update
8 min. read
Updated on
Read the affiliate disclosure page to find out how can you help Windows Report effortlessly and without spending any money. Read more
Key notes
- Error code 0x80190001 is one of the most common Windows update failures from older Windows OS to the latest.
- The error can prevent you from downloading new updates, leading to compatibility and security issues.
- One of the quick ways to fix the issue is to disable your antivirus software when updating your PC.
Installing the latest updates on your Windows computer may take longer than expected.
That happens because various technical issues and errors can either block or limit the update process. Regarding update errors, we have provided fixes for notable ones like Windows 10 update error 0x8007042B.
Now, it is another notorious one in error 0x80190001 that is hindering Windows users from updating their PCs. Here’s how one user describes it:
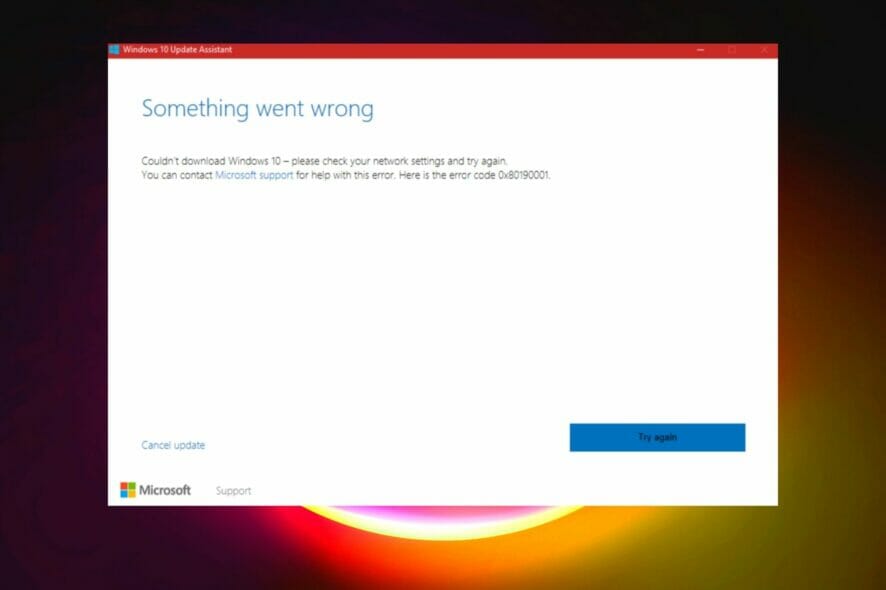
Upgrading to windows 10 from windows 7 pro. Repeatedly getting error code 0x80190001 after waiting a long time for the download. There is also a message to check network settings.
Troubleshooter couldn’t find any problems so I removed myself from the home group. Made no difference.
This error affects every version of Windows. For example, many users have reported that error 0x80190001 blocks the Creators Update install.
Error 0x80190001 can prevent you from downloading new updates, leading to compatibility and security issues. This guide will show you to fix the error with ease.
How do I fix the error code 0x80190001?
1. Run the Update Troubleshooter
- Press the Windows key + I to open the Settings app.
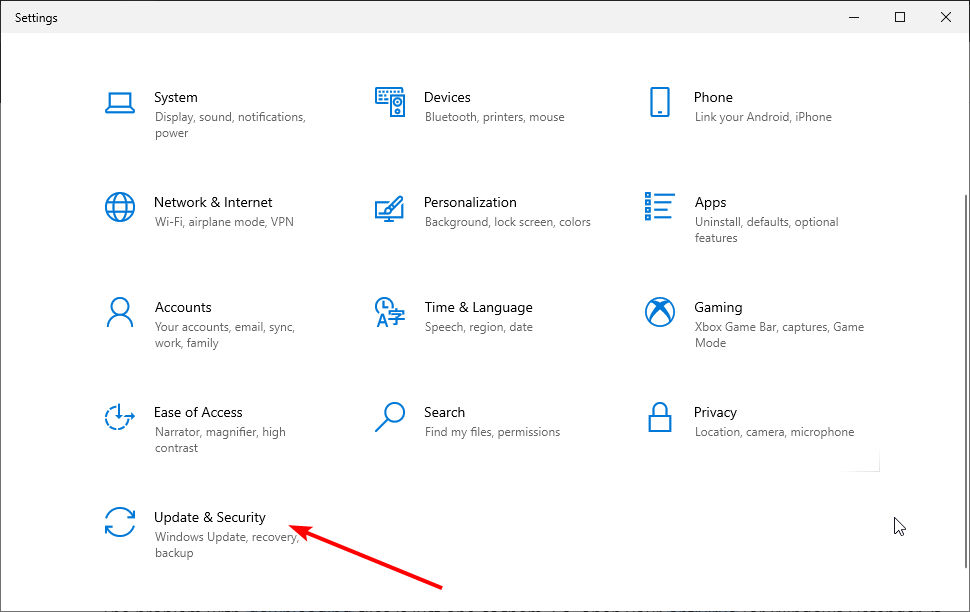
- Now go to the Update & Security section.
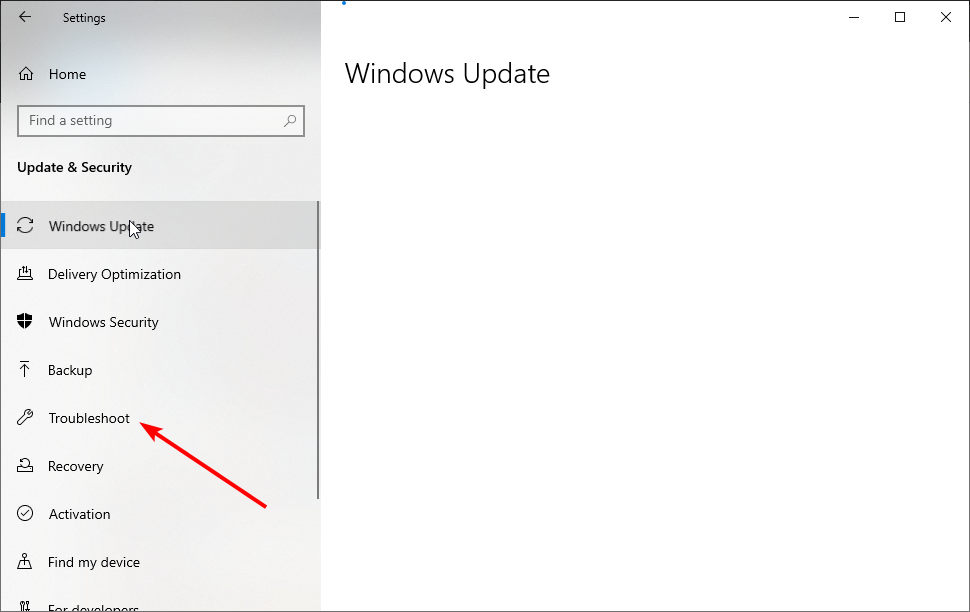
- Select Troubleshoot from the menu on the left.
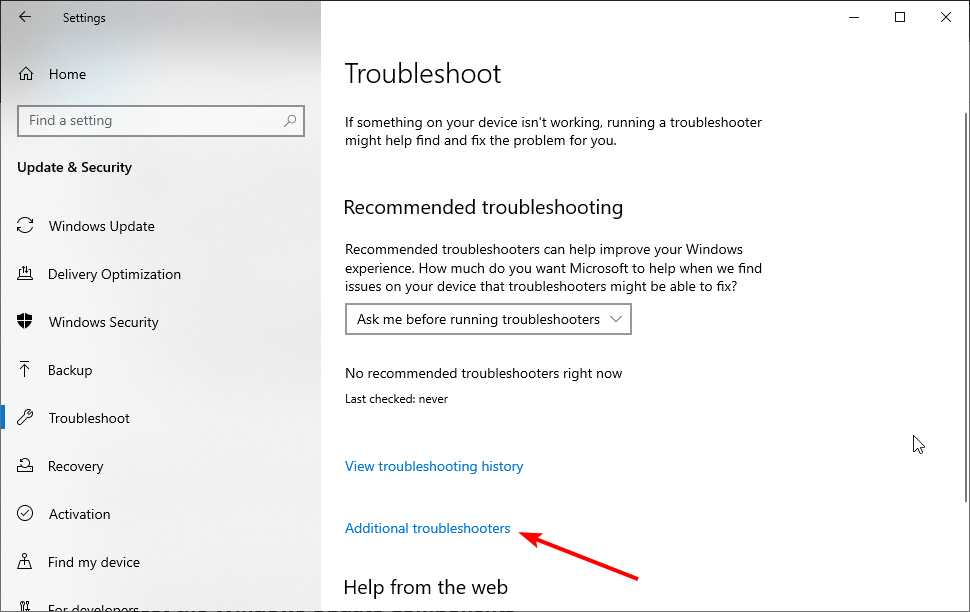
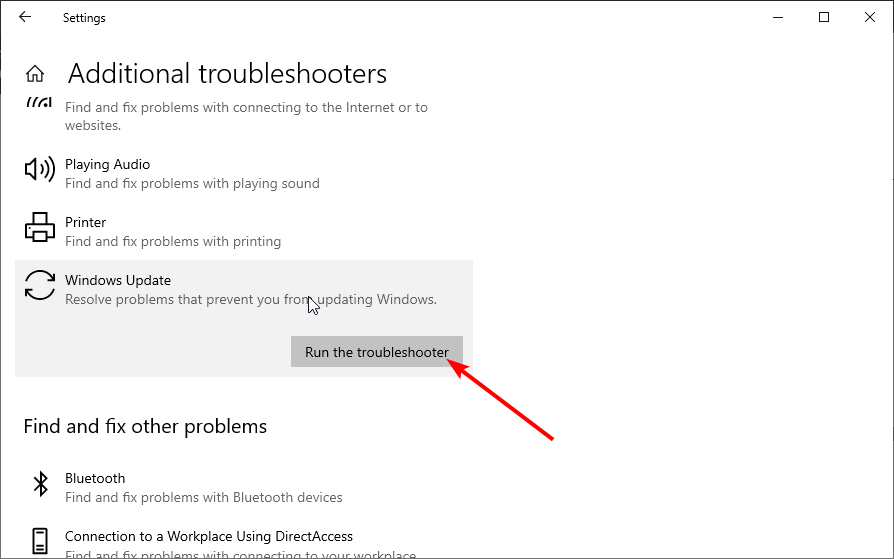
- Choose the Additional troubleshooters option.
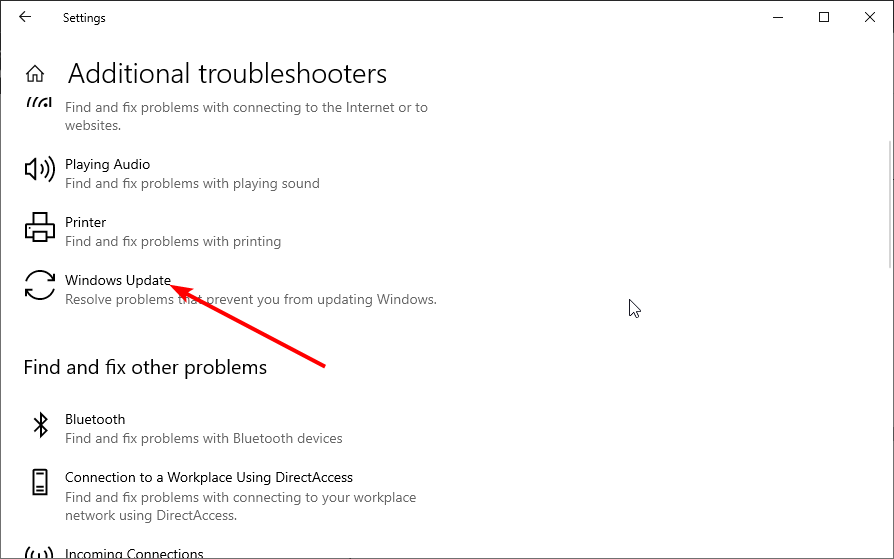
- Now, select Windows Update.
- Finally, click the Run the troubleshooter button.
- Follow the instructions on the screen to complete the process.
The Windows Update troubleshooter is one of the built-in tools to fix update errors like 0x80190001. Once the troubleshooter is finished, try to update Windows again and check if the problem is still there.
2. Repair your system files
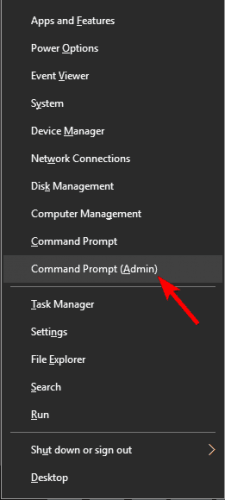
- Press Windows key + X and choose Command Prompt (Admin) or Powershell (Admin).
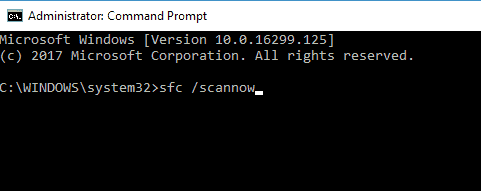
- When Command Prompt starts, run the sfc /scannow command.
- SFC scan will now start. Remember that an SFC scan can take up to 10-15 minutes, so don’t interfere with it, and don’t run any other applications in the background.
Another cause for error 0x80190001 can be file corruption, and if your system files are damaged, you need to repair them using an SFC scan.
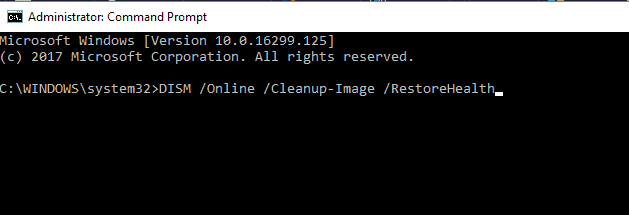
Once the SFC scan is finished, check if the problem is still there. If the issue persists or you could not run or complete the SFC scan, you need to use the DISM scan instead.
To do that, start Command Prompt as administrator and run the command below: DISM /Online /Cleanup-Image /RestoreHealth
This should fix the damaged files and solve any issue with the SFC scan
However, instead of going through the stress of repairing files manually, we recommend using a third-party repair application.
If your system files are faulty or missing, these tools can replace them, restore your registry, and even do a comprehensive hardware analysis of your Windows PC.
They repair and reverse damage on your Windows OS by replacing damaged and removed files with new Windows files and components from the constantly online databases.
3. Disable your Internet connection
According to users, you might be able to fix error 0x80190001 simply by disabling your Internet connection. Make sure that your update is downloaded and installed.
During the installation process, disable your Internet connection. After doing that, follow the instructions on the screen to complete the installation. Of course, this isn’t the best solution, but few users claim it works, so you might want to try it out.
4. Check your antivirus
The problem might be your antivirus software if you can’t update Windows due to error 0x80190001.
Although antivirus tools offer protection, they can often interfere with your system and cause various errors.
To fix this problem, many users suggest temporarily disabling some features or your antivirus. However, if removing the antivirus solves the issue, you should consider switching to a different antivirus solution.
There are many error-free antivirus options like the ESET NOD32 on the market. This software is your best bet to prevent future issues and keep your system running smoothly, as it is an antivirus with low CPU usage.
5. Disconnect all peripherals
If you have problems with error 0x80190001, the issue might be your USB devices. Sometimes USB devices can interfere with your system, leading to similar problems.
However, you might be able to fix the problem simply by disconnecting all USB devices before trying to install the update.
Disconnect all USB devices except for your mouse and keyboard. Once everything is disconnected, try to install the update again.
This isn’t the most efficient solution, but several users reported it works, so feel free to try it.
6. Download and install the update manually
- Find the KB number of the problematic update. You can do that from the Windows Update section or the Update History website.
- Once you get the KB number, go to Microsoft’s Update Catalog website and enter the KB number.
- A list of results will appear. Download the update that matches your system architecture and install it.
Several users reported successfully circumventing error 0x80190001 simply by manually downloading the update. However, we must mention that this isn’t a permanent solution, and the issue might reappear when you try to update your system.
7. Make sure your date and time are correct
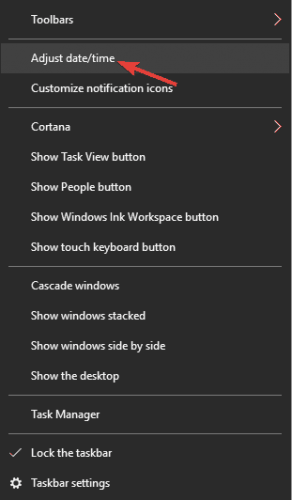
- Right-click the clock in the bottom right corner and select Adjust the date/time.
- Toggle switch for the Set time automatically option backward to disable it.
- Wait for a few moments and then turn it back on again.
A couple of users reported that error 0x80190001 occurred due to incorrect date and time on their PC. Adjusting your time and date should fix the issue in this case.
After following the steps above, the date and time will be readjusted and synchronized. You can also click the Change button and manually adjust the date and time if you want.
8. Perform a Clean boot
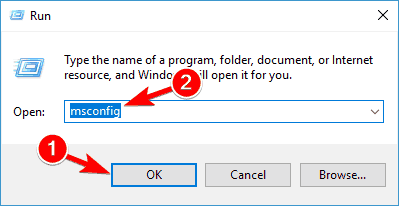
- Press Windows key + R, enter msconfig, and click OK.
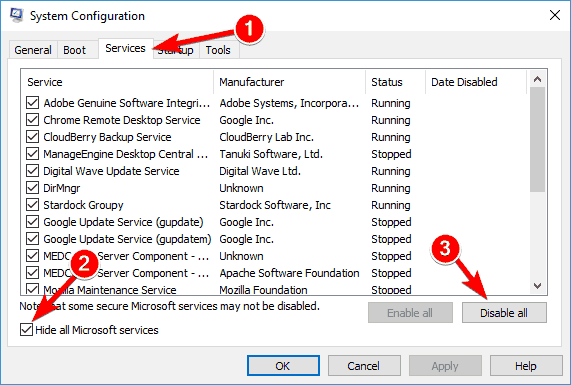
- Click the Services tab.
- Check the box for Hide all Microsoft services.
- Now, click the Disable all button.
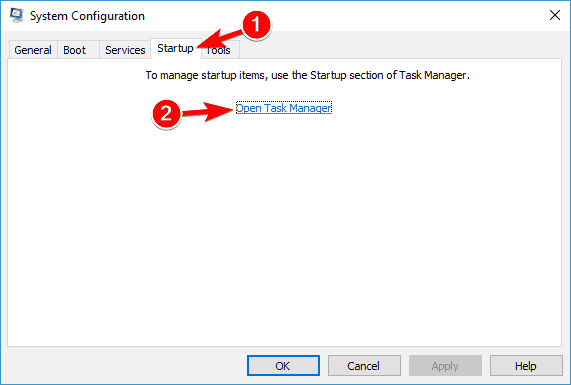
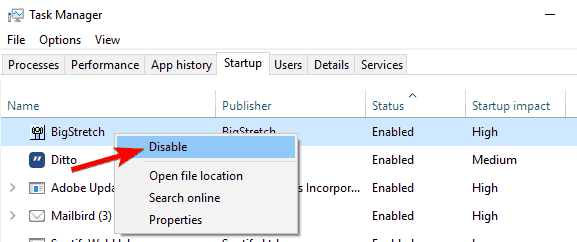
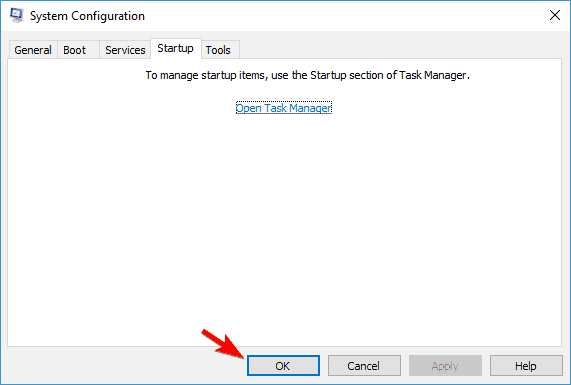
- Go to the Startup tab and click Open Task Manager.
- Right-click on each application there and choose Disable from the menu.
- Go back to the System Configuration window and click Apply, followed by OK, to save the changes.
This issue can sometimes occur due to third-party applications and services. However, you can fix that by performing a Clean boot. Then, make sure you restart your PC and check if the issue is resolved.
9. Perform an in-place upgrade
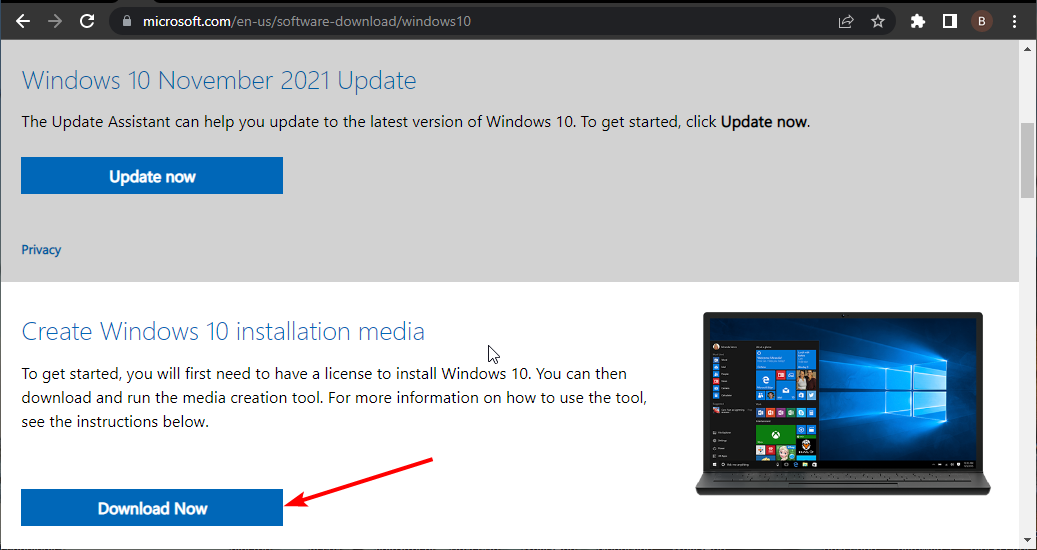
- Go to Microsoft’s Windows 10 upgrade website.
- Click the Download Now button under the Create Windows 10 Installation Media option.
- Now, click the downloaded tool and Accept the license terms.
- Then, select Upgrade this PC now and click Next.
- Check the Keep personal files and apps option to keep your apps, files, and settings.
- Click Install to launch the upgrade process.
According to users, sometimes you can fix this problem simply by performing an in-place upgrade. However, performing an in-place upgrade will force Windows 10 to update to the latest version.
Once the setup is finished, you’ll have the latest version of Windows installed, and the problem will be resolved.
How can I fix error code 0x80190001 on Windows 11?
The main reason you are experiencing the update error 0x90190001 on Windows 11 is interference from your antivirus. You can solve this by disabling your antivirus or obliterating it.
Another known cause of the issue is incorrect time and date. We have shown how to change this earlier in this guide. Finally, you can use our other solutions to fix this error, as the causes are similar on all Windows PC.
Why does the Windows Update error 0x80190001 appear?
As mentioned earlier, there are various versions of this error, each with varying causes. Below are some of the popular ones:
- Windows 10 upgrade failed – If your Windows 10 upgrade fails due to this error code, try some of our solutions and check if that solves the problem.
- 0x80190001 Creators Update, Windows 10 – Many users reported this error while trying to install Creators Update. Bear in mind that this issue can affect any Windows 10 update, but in most cases, you can solve this problem by disabling your antivirus.
How do I do a factory reset with Windows 10?
- Press the Windows key + I to open the Settings app.
- Choose the Update & Security option.
- Click Recovery in the left pane.
- Click the Get Started button under the Reset this PC option.
- Choose to keep your files or wipe everything and click the Next button.
- Now, follow the simple onscreen instructions to complete the process.
If you encounter this issue, the standard solutions listed above will assist you in resolving the Windows 10 update error code 0x80190001.
You should also verify the product key to determine if it is a valid version because this problem might occur even if you use a copy of Windows.
If you are facing other issues like the Windows 10 update error 0x800f0900, check our easy guide to fix it quickly.
Feel free to let us know in the comments below if any of our fixes helped you solve the issue.

